Monday, 27 October 2014
Evaluation
Overall, I found aspect of my first advertising shoot challenging but also interesting. There are many things which I feel I could improve on such as experimenting with different lighting techniques before I finally chose which one I want to shoot with. I think this would help my confidence in being able to set up the lighting and use different colours of gels when shooting. I also feel that I chose a difficult subject to shoot as it was hard to control the exposure on different parts of the bottle due to all the different uneven shapes within it. Next time I think I would think more carefully when choosing a subject to shoot.
My final images

This is my final finished image which I have edited and placed on an a3 canvas for hand in.
Editing Process
After reviewing all of my images I chose which one I felt was most successful.

There were a few things about the image which I did not like and therefore I planned on correcting these things using photoshop.
Firstly, using photoshop raw, I lightened the highlights, and darkened the blacks, thus creating more of a contrast within the image.
I then darkened the blue within the image a little to get a deeper blue colour.
I then adjusted the white and shadows to make them lighter.
I then darkened the shadows within the image.
Later I went onto cropping the image the get the correct amount of framing which I wanted, as I wanted the bottle to be the in the centre of the image.
I then used the clone stamp tool to take away all of the little bubbles that the water inside the bottle had created making it looking smoother with no bumps.
As I had realised that the lid of the bottle was too dark, I then decided to look at my other images and take the lid from one of them and add it to my chosen image. I done this by creating a new layer and painting into the image making it appear. I used the feathering tool whilst doing this so I wouldn't get any harsh lines.
After this, I had my most challenging part of editing. As I wanted a completely black background I had to paint on black around the bottle very carefully. To do this successfully, I lowered the capacity of the paint to 35% when doing it around the edge of the bottle so I would not paint inside it.
 This is my image after the editing process.
this is my final image before any editing.
Firstly, using photoshop raw, I lightened the highlights, and darkened the blacks, thus creating more of a contrast within the image.
I then darkened the blue within the image a little to get a deeper blue colour.
I then adjusted the white and shadows to make them lighter.
I then darkened the shadows within the image.
Later I went onto cropping the image the get the correct amount of framing which I wanted, as I wanted the bottle to be the in the centre of the image.
I then used the clone stamp tool to take away all of the little bubbles that the water inside the bottle had created making it looking smoother with no bumps.
As I had realised that the lid of the bottle was too dark, I then decided to look at my other images and take the lid from one of them and add it to my chosen image. I done this by creating a new layer and painting into the image making it appear. I used the feathering tool whilst doing this so I wouldn't get any harsh lines.
After this, I had my most challenging part of editing. As I wanted a completely black background I had to paint on black around the bottle very carefully. To do this successfully, I lowered the capacity of the paint to 35% when doing it around the edge of the bottle so I would not paint inside it.
Reviewing my images
After shooting with variety of lighting techniques and background, I had to review all of my images and narrow it down to few which i felt where the best and that best fitted the brief.
Using adobe bridge, I used to starring system to pick out what I felt where the best images and I was able to narrow it down to 4. Below are the 4 images which I chose.
 The reason i chose the first one was because I liked the lighting in in and I felt it is correctly exposed. What I do not like it about it the fact that the blue tones are very dark which causes the bottle to lose detail.
I chose the second image because I felt the blue tones were lighter and there was more detail within the bottle itself. I also liked the central framing of the image and the reflection at the bottom.
I chose the third image because it is very different from the first too. This was created when I changed the background from black to blue. The reason I did not chose this image was because I felt that the top of the bottle was too dark and a lot of detail was lost within it.
The fourth image is the image which I decided to use for my final hand in. The reason for this was because I liked the way the bottle was sitting and I also liked the contrasting colours and tones within the bottle. The only thing I didnt like was the fact that the you could not see the lid of the bottle and that also half of the background was blue and I would prefer it to be all black but I felt i correct these issues later in the editing process using photoshop.
Using adobe bridge, I used to starring system to pick out what I felt where the best images and I was able to narrow it down to 4. Below are the 4 images which I chose.
I chose the second image because I felt the blue tones were lighter and there was more detail within the bottle itself. I also liked the central framing of the image and the reflection at the bottom.
I chose the third image because it is very different from the first too. This was created when I changed the background from black to blue. The reason I did not chose this image was because I felt that the top of the bottle was too dark and a lot of detail was lost within it.
The fourth image is the image which I decided to use for my final hand in. The reason for this was because I liked the way the bottle was sitting and I also liked the contrasting colours and tones within the bottle. The only thing I didnt like was the fact that the you could not see the lid of the bottle and that also half of the background was blue and I would prefer it to be all black but I felt i correct these issues later in the editing process using photoshop.
My shots from shooting day two
Below are my contact sheets from my second day of shooting.


This is my first set of shots from shooting day two. I started off by using the same black background to test my exposure. I then went on to using the same technique as before by having the white and blue background. I felt i was getting closer to the image which I wanted but many of the images where not framed correctly and the lighting was slightly too bright.
After looking at all of my shots, I felt that the most successful where the last few which I had shot. This was because I preferred the framing and position of the skull compared to before.
Second Shooting Day
After my first shoot, I realised there were a few things I would like to change about my shoot.
I did not alter my equipment list in anyway, it was just a case of rearranging my lighting in order to get a successful image.
Below are the images of my lighting set up which I used on the second day of shooting.

 This is an image from the angle of view which I shot the image at.
I did not alter my equipment list in anyway, it was just a case of rearranging my lighting in order to get a successful image.
Below are the images of my lighting set up which I used on the second day of shooting.
This is the lighting set up i used, I placed the softbox at the back of the skull, and instead of the same previous black background I placed half of a blue gel over the light and this created a lighter effect on the skull.
Further review of images before reshoot
After my first shoot, I felt that none of the images where up to a high enough standard that I could have used.
The lighting was too dark which meant I was losing detail in the bottle. In this post I will review some of the images which I previously shoot and think about what I could change to make them better.


The lighting was too dark which meant I was losing detail in the bottle. In this post I will review some of the images which I previously shoot and think about what I could change to make them better.
These are two of the first images which I took. I firstly shot these in order to test my lighting to see if the image was correctly exposed. After looking at them on the computer on a larger scale, I realised there were many things which I needed to change in order to get the image I wanted to achieve. I realised that the image looked very bland without any colour being out into it, this is when I decided to add the blue gel. I felt that by adding the blue tone the images would become more interesting and there would be various shades of blue within the image which would create a variation in interesting tones.
After then adding the blue tone, I realised that I then needed to change the lighting arrangement as the blue was also causing me to lose tone and textures. By changing the position of the light I felt I would be able to lighten the skull.
I then decided to change the background entirely as I still was not getting the image I wanted. I also moved the softbox so that the skull was now getting lit from behind. This was so I could stop the very overexposed area on the chin from lighting up. I realised that from this process, I was getting more interesting images and the tones and detail were much better. I also decided to then move the skull into different positions to see what I could achieve from this.
What I learned/to improve on....
Coming away from this shoot I realised that I had to change my lighting set up and rearrange it so that the skull was being lit from behind. I also learned that instead of having a complete black background, I should instead have half of a blue background so that I could get better tones and contrast.
Equipment List
In order to create the specific effects I would like on my Crystal Head vodka bottle I must acquire the correct equipment so I will be able to create the type of image I want.
Firstly I thought about the type of background I thought would look best and I decided to have black card places behind the skull. I then felt it would add a nice effect to the image if I placed reflective black paper under the skull thus creating a reflection and adding more detail to the image.
I thought about various colours I would like to reflect into the skull to add more contrast, texture and colour. I finally decided that adding a blue gel over my barn door light attachment would give me the colour which I wanted.
Below is the equipment list which I used on the days of shooting...
Nikon D800
Crystal head vodka bottle
50mm lens
105mm macro lens
2 lights (soft box and barn doors)
blue gels
blue gel for background
black card x 2
reflective paper
white card x 2
large reflector x 2
small reflector
large pegs x 4
tripod
light meter
sync lead
Tuesday, 30 September 2014
Contact Sheets
Here are the contact sheets from my shoot.
 Shooting the above images was proving to be very challenging and I was struggling to get the shade and tones which I wanted. I also felt that the lighting was perhaps a little too dark and this was causing the blue tones within the bottle to be too dark a which was causing me to lose detail in the bottle.


I did find the shoot overall quite challenging. I struggled at points to get the exposure on each crease of the glass correct. I also had to try various methods of adding the blue gel as it many it was not very clear.
I tried changing the position of the bottle to see if that would help me get the image i want.
I felt that near towards to end of my shoot when my lecturer Mike helped me and changed the background that it became easier and clearer of how I had to set up my lighting.
I felt that with these images I made some progress. after releasing the blue tones wee too dark I changed my lighting set up so that it the blues were lighter which I feel worked well in adding more detail of the bottle.
After having a chat with my lecturer Mike, he helped me rearrange my layout so that my lighting was not so dark and so that I would have an entire blue background which would add my tones and contract to the images without losing of the crucial detail. I felt better towards the end of the shoot but realised that I would need to shoot again in order to get the best images I wanted.
Shooting Day
For my shoot, I plan on using two lights with one softbox attachment and the other a barn doors attachment in order to light my bottle the way I want.
I plan on having a plain black background, I am hoping that this will show the outline of the skull head and be less reflective as it would appear against white paper.
I have purchased a piece of a A3 black paper and also a piece of A3 perspex paper in order to get a reflection from the bottle.

 Above are both of the lights which I will be using in the studio.
 Above is the lighting set up which I plan to use, I plan to put a blue gel over my barn doors light in order to give off a blue reflection to the bottle.
I plan on having a plain black background, I am hoping that this will show the outline of the skull head and be less reflective as it would appear against white paper.
I have purchased a piece of a A3 black paper and also a piece of A3 perspex paper in order to get a reflection from the bottle.
Shooting Ideas
After researching online various types and shapes of glassware, I decides that I wanted to shoot a Crystal Head vodka bottle.
I knew this would be challenging as there are many different shapes within it and I thought this may cause problems when I am trying to light it.
Here are some research images of the bottle which I have found online.


I knew this would be challenging as there are many different shapes within it and I thought this may cause problems when I am trying to light it.
Here are some research images of the bottle which I have found online.
There were not many studio shoots I could find online which were similar to what I have planned to do with my shoot. I think all of these images apart from one are badly exposed and lit, so it will be challenging to get it lit accurately.
Monday, 1 September 2014
10 Glassware Research Images

This is the first image I have chosen to research. The advertising style of this image is very minimal, with a plain background and well organised and planned composition. We can see that the photographer has shot this image within a studio, and they have used soft lighting which may have been soft boxes. We know because of the softness and lack of shadows the objects are creating. We can see that the objects have been lit from above also due to the shadow. The composition has been successfully achieved as the layout of the objects allow us to travel throughout it an also the random pops of colour also adds to the composition.

This is the second image i have chosen, we can see from this that this image is a more obvious advertising image. We can see this because the whiskey bottle is branded. This type of advertising would appeal to an older generation who perhaps already buy this type of product. We can see that again a soft lighting has been used and the bottle has been lit from a variety of angles. The bottle has been evenly lit from left, right, centre and above. We can see that very little light has been projected onto the background as only a very small portion of it is lit. The composition works well as the bottle is the focal point of the image but it then lead oure eyes to the glass of whiskey with ice.

This is the third image which i am going to analyse. This one is particuarly different from the previous ones. We can see that this is is a bottle of aftershave which would appeal to a predominately male market. We can see that the concept of the advertising shoot has came from the name of the aftershave "cool water". The composition of this image has been well done as even though the bottle is more to the sude of the image, the ripples created in the water give more movement and texture to the image. The black colour of the water also makes the blue coloured bottle stand out more.

This is the fourth image which u have chosen to research. Again, we can see the relation to alcohol in this image which means it would appeal to an older more mature group of people. Th composition is well done i think as each glass is evenly spread out and also has a different object being dropped into it which makes the image more interesting. The use of the reflection also shows that the image has been lit from above and from both sides due to the soft shadows of the reflection.

This is the fifth image, we can see that this image is quite different from the others which i have researched. The type of lighting which has been used is rim lighting, this is created by using the black back ground and only lighting the edges of the glass. The composition has been successfully achieved as are yes travel throughout the image as the glasses have been placed in order of their size. This image would most likely appeal to the older generations who like drinking whiskey.
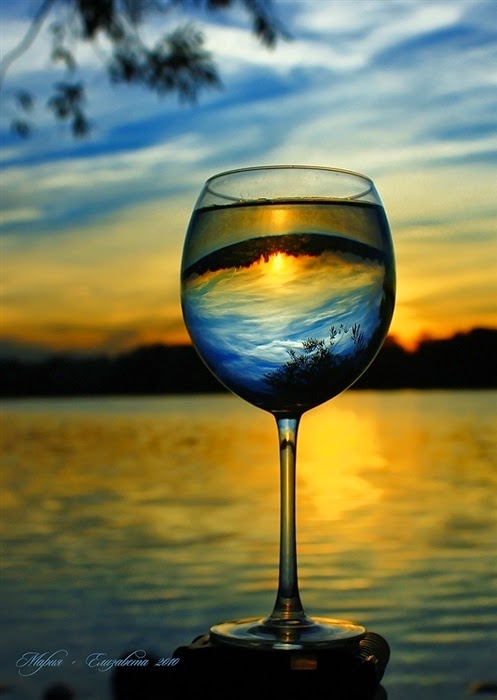
This is the sixth image which I have chosen. So far this is the only glassware image which has been taken on location. The type of lighting which has been used is clearly natural lighting which has been taken as sunset to give it a darker and more contrasty look. The good use of depth of field also allows us to focus on the glass. The composition works very well as the reflection of the sunset coming through the glass creates a more interesting image. This photograph would probably appeal to most
ages.

This is the seventh image which I have chosen. This image has a very well organised and thought out composition as we can see the photographer has clearly laid the objects out in order of size. This allows the viewers eyes to travel over the image. The use of the lines in the background gives the image more texture and creates interesting shapes. We can see the image has been lit more dully than the others and it appears that it is mostly lit from above.

This is the eighth image which i have chosen. The interesting shapes of the image have been specifically placed in order to create unusual shapes. This also adds to the composition fo the image as we can see that they have been places also the create the shadow reflections of each glass. There is very little colour in the image and it does appear quite dull.
Subscribe to:
Comments (Atom)